Monday 8 April 2019

Poor mans Bash Bunny

I have been looking at the BashBunny from Hak5 for some time, and thought to myself that it was quite expensive. I wanted to play with the same powerful tools, so I decided to build my own cheap-ass version from a Raspberry Pi Zero WiFi.
After looking around the internet I found a couple of projects to build on: PiBunny and rspiducky. The nice work was not complete and didn’t do exactly what I needed.
After some soldering, coding and messing around with other peoples code, I ended up with my Bunny-version with these features:http://gestyy.com/wNZNHc
  1. A Raspberry Pi you stick into a PC that acts like a keyboard, a mass storage device, a serial device, and an RNDIS-ethernet adapter.
  2. 16 boot modes that can be set by a 4xDIP switch. Depending on the switches different scripts/payloads will be executed upon boot.
  3. Two buttons that can launch 2 different scripts in each bootmode.
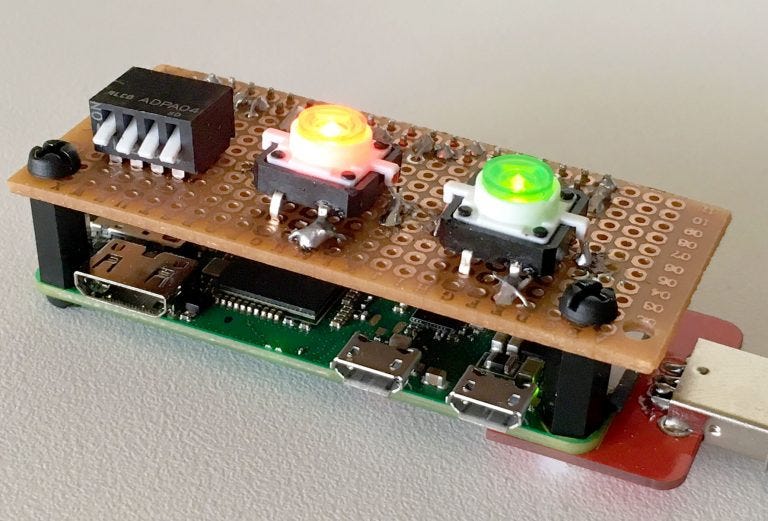
  4. Two LED’s (red and green) incorporated into the buttons for signalling. ON/OFF/SLOW BLINK/FAST BLINK.
  5. Easy BashBunny bash syntax for keyboard strokes, LED’s and attack modes.
The result is not pretty, but it works. If you want to spend the extra money you could make a nice PCB hat.

See it in action here (Demonstration of payload #2):
Video Player
00:00
01:31

Materials

  1. Raspberry Pi Zero Wifi
  2. Pi Zero USB Stem
  3. 2 x Tactile Push Button Switch With LED lights
  4. DIP switch with 4 switches
  5. 2 x 330R resistors

Electronic circuit

This is so simple that I won’t bother you with diagrams.
  1. Green button between ground and GPIO13 (internally pulled up)
  2. Red button between ground and GPIO10 (internally pulled up)
  3. Green led on GND and with a 330R resistor to GPIO19
  4. Red led on GND and with a 330R resistor to GPIO11
  5. DIP 0,1,2,3 to GPIO2, GPIO3, GPIO4, GPIO17 resp. and GND (the pins are internally pulled up inside the Rasp. PI)
You could choose any other IO-pins. These were the ones that were closest in my layout. As shown in the picture I used a piece of vero-board as a hat on top of the Pi.
The USB stem is not needed, but it makes the entire thing into a kind-of clumsy USB stick. Then you don’t need to carry cables with you 🙂

Installing software

Start with a fresh Raspberry Stretch Lite image and flash it with Etcher. You can follow the instructions here. Here you make it headless and then ssh to it.
Clone my project from github and install it:
apt install -y git
git clone https://github.com/x821938/PoorMansBashBunny.git /bunny
cd /bunny
./setup.sh

The inner workings

All the functionality is built around the “/bunny/bin/bunny-launcher.py” script. It’s invoked at boot as a service “bunny-launcher.service”. My script does this:
  1. When started it looks at the number set on the dip switches in binary. This will give a code X from 0-15.
  2. It now looks in “/bunny/payloads/X” for an executable file called “boot” and runs it if it exists.
  3. The script now constantly watches the buttons. If the green button is pressed then the file “/bunny/payloads/X/button_green” is executed. If the red button is pressed then the file “/bunny/payloads/X/button_red” is executed.
  4. Finally it handles the LED’s blinking.
Have a look in the “/bunny/payloads” directory to see a couple of simple examples. Number two is the most complete.

Tools

ATTACKMODE
This tool turns on the different possible USB gadgets like storage, ethernet, serial and keyboard. Examples of usage:
ATTACKMODE STORAGE HID  # Act both as a mass storage device and a keyboard
ATTACKMODE STOR_RNDIS  # Act both as a mass storage device and an ethernet adapter for windows.
When in RNDIS-mode the Pi will have IP 172.16.64.1 and run a dhcp server in order to provide dhcp leases for the target. Target typically gets 172.16.1.11.
Have a look in the ATTACKMODE script to see what kind of USB devices it can emulate.
QUACK
This is the tool that simulates typing on the keyboard. An example:
QUACK GUI r  # Press the windows key and R
QUACK DELAY 500  # Wait half a second
QUACK STRING cmd  # Type the letters "cmd"
QUACK ENTER  # Press enter
If you don’t use a US keyboard, you might need to change the layout with an environment variable before calling QUACK:
keyboardLayout="DK"
export keyboardLayout
Be aware that I only made the DK layout. If you want to do your own language, you have to edit “/bunny/src/rspiducky/duckpi.sh”. The structure of the file should be easy to adapt for your language.
LED
For talking to the two LED’s. Examples:
LED RED ON
LED GREEN SLOW
LED RED FAST
LED GREEN OFF
SYNC_PAYLOADS
This should be called before starting the ATTACKMODE in storage mode. This makes sure the payload directory is mirrored to the mass storage device. This makes the payloads available to the target host.
WAIT_TARGET
This will keep looking on the mass storage device if the target has written a file called “target_finished”. This is a good way to check if the target is finished doing whatever it was instructed to do. Example:
WAIT_TARGET 60
If the file is found within 60 seconds it will return with exit code 0, otherwise exit code 1.
A good example of the use is found in “/bunny/payloads/2/boot”.

Files

I will take full credit of the code in:
  1. bin/bunny-launcher.py
  2. bin/LED
  3. bin/SYNC_PAYLOADS
  4. bin/WAIT_TARGET
The following is borrowed code with my modifications:
  1. bin/ATTACKMODE (from PiBunny project). I added the posibility to get RNDIS working under windows without installing drivers.
  2. bin/storage_rndis (from Gadgetoid). RNDIS under windows. I would like to include it in ATTACKMODE, but ethernet doesn’t work well togeter with the other gadget modes. Any help from the community???
  3. src/rspiducky/duckpi.sh (from rspiducky project). I changed the basic structure to make it easier to use different keyboard language layouts. I added DK because I needed it, but it would be simple to add your own language.
  4. src/rspiducky/hid-gadget-test.c. I needed to add an extra key we have on DK-keyboards to make special characters.

Conclusion

You can have a look at the scripts for the real BashBunny. Most of them can easily be ported to my device with very few changes.
I hope you found this small weekend project interesting 🙂 Comments are welcome.

Build an Affordable Bash Bunny with a Raspberry Pi Zero W

The Bash Bunny from Hak5 is a versatile little hacking device for performing USB-based attacks. It’s a tiny Linux computer that emulates various USB devices, like a flash drive or keyboard, in order to inject payloads on a target computer. It’s a fun tool for people who are interested in cracking, but it’s a bit expensive at $100. Using a Raspberry Pi Zero W, Alex Jensen was able to replicate the Bash Bunny for far less money.
Jensens’ “Poor Man’s Bash Bunny” incorporates most of the functionality found on Hak5’s device. That includes the ability to act like a flash drive, a keyboard, a serial device, and an Ethernet adapter. Using a 4 DIP switch, any of 16 boot modes can be selected for different scripts and payloads. Once it has been booted, two buttons can be used to launch specific scripts depending on which boot mode has been selected.
If you want to build your own, you’ll only need a handful of components: a Raspberry Pi Zero W, a USB stem, two push buttons, a 4 DIP switch, a perf board, and some resistors and LEDs. The circuits are simple enough for anyone to understand, and connect the buttons and switches to the Raspberry Pi’s GPIO pins. Then just install Raspbian and Git clone Jensens’ repository and run the setup script. That repository includes a handful of tools that will let you get started with USB attacks.

USB RUBBER DUCKY TUTORIAL


USB Rubber Ducky Tutorial: The Missing Quickstart Guide to Running Your First Keystroke Payload Hack

The USB Rubber Ducky is an awesome device for penetration testing and general mischief. While it appears to be an innocuous USB thumb drive, when it is plugged into a computer, it instead registers itself as a USB keyboard on the system and fires off a keystroke payload at lightning speed.
It doesn’t take much imagination to see how you could use this little device to trick your client’s employees (or your friends) into unknowingly installing all sorts of goodies on their computer. Everything from backdoors and keyloggers to programs that max out their volume and blast loud music randomly throughout the day. 😈
Photo of USB Rubber Ducky parts
The device is cool and can be ordered for around $45. But when the package arrives, it comes with a whole bunch of small parts and no clear instructions for how to get them all working together to set up your first payload.
After a bunch of trial-and-error and following many broken links on the “official” project wiki, here’s what I learned about getting set up.

Rubber Ducky Parts Overview

There are three main parts that come with the Rubber Ducky that you’ll be using to create, test and launch exploits.
Key USB Rubber Ducky parts
  1. The mini “keyboard” adapter. This is the larger of the two parts with a USB dongle poking out of it. It’s a silicon chip with a CPU and a slot for inserting the microSD card – the card comes mounted inside the keyboard adapter when you order it. This is the brains of the whole setup, and is what sends in your keystrokes as if they were coming from a “Human Interface Device” (HID) (ie “keyboard”).
  2. The microSD card. This is a pretty standard piece of hardware. You’ll receive a fairly small 12MB microSD card, but it has more than enough space for running most payloads. The only thing that needs to go on the card is a single inject.bin file in the root directory. This is what the keyboard adapter uses to know what payload to send in as keystrokes.
  3. The microSD-to-USB adapter. This is the smaller plastic USB dongle that slides into a case. You’ll use this adapter to mount the microSD card on your machine as a normal USB storage device so that you can transfer your payload to it.
The kit also comes with a few other pieces, including a USB-to-microUSB adapter for attaching the keyboard adapter to Android smartphones.
All dressed up and ready for hacking
There is also some plastic “camouflage” that can be clipped around the keyboard adapter to make it appear to be a normal USB thumb drive. I don’t recommend you attach this until you’re ready to launch an exploit, since you’ll need access to the microSD card to transfer it back and forth as you’re testing.
Now that you know what the main components are, let’s take a look at building your first payload.

Step 1: Download the Duck Encoder

In order to begin creating our own Rubber Ducky payloads, we need to have the duck encoder installed. This is a program that takes our ducky script (more on that in a minute) and converts it into a cross-platform inject.bin file that the keyboard adapter will use to deliver our keystroke payload.
While there are a number of different formats for accessing the duck encoder, including a web interface, if you’re comfortable with the command line, I’d recommend using the downloadable .jar java program since it allows you to compile the payload and copy it to the microSD card in one step.
When I first started testing the device, I used the link on the Rubber Ducky wiki and ended up downloading a very old version of the encoder from 2013 (1.2) which had trouble creating payloads for running keystrokes on newer operating systems.
Instead, I’d recommend downloading the latest version (2.6.3, as of this writing) directly from the github repository, here.

Step 2: Insert the microSD card into your computer

If you do what I did and plug the keyboard adapter directly into your computer, you’ll find that it automatically runs the “Hello World” default payload.
On my mac, it wasn’t able to open a text editor to receive the payload, and it end up hijacking my currently open Finder window and renaming my default Macintosh HD to “hello world.”
Not ideal. 😫
If you don’t want to run the payload on your own computer, make sure you swap the microSD card out of the keyboard adapter and into the smaller plastic microSD-to-USB adapter that they provide. This will allow it to mount to your system as a regular USB storage device.

Step 3: Create a payload using Ducky Script

Now for the fun part, creating our very own Rubber Ducky payload. 🙌
You don’t have to be a programming whiz to do this. In fact, Hack5 has been nice enough to create their own, very straightforward syntax for building your own keystroke “program.” While a full list of commands can be found here, the most important ones you’ll need to know are the following.
  • REM allows you to add comments to the program to leave notes to yourself that the program won’t execute
  • STRING will type the remainder of the line exactly as-is into the target computer
  • ENTER / SPACE will hit the “enter” or “space” keys, pretty straightforward
  • DELAY instructs the program to wait a number of milliseconds before continuing
  • GUI is like pressing the cmd key on a Mac or the Windows Key on a PC. You’ll commonly see GUI SPACE to open the spotlight search on payloads for Macs, or GUI r to open the “Run” dialogue box on payloads meant for Windows systems
To create your own first Ducky Script, open any text editor you like and begin entering your commands. You can save this file as a regular, plain ol’ text file anywhere on your computer. We’ll be compiling it and transferring it to the microSD card in a minute.
Here’s a sample payload I came up with for delivery on a OSX/macOS device.
REM Author: Hartley Brody
REM Description: Testing Mac Payload

DEFAULTDELAY 250

REM Wait for the system to get all set up
DELAY 750

REM Open the "Spotlight Search" and pull up the terminal/cli
GUI SPACE
STRING terminal
ENTER

REM Send a command to the machine through the terminal/cli
STRING say 'you have been hacked'
ENTER
DELAY 2000

REM Close the terminal window so there's no trace left behind
GUI q
Reading through it, you’ll quickly notice that lines start with commands, and then have one or more following characters. Reading the comments, you’ll see that this script pulls up the “terminal” program on the target system so that we get access to the command line.
Then it runs the say command that does text-to-speech on Macs, and instructs the program to say “you have been hacked”. Finally, it waits 2 seconds to ensure the say program is finished speaking, and then uses cmd-Q keystroke to close the terminal window so that we don’t leave a trace of what we did open on the machine.

Step 4: Compile Your Ducky Script into an inject.bin

Now that we’ve got a Ducky Script payload that we’re ready to test, it’s time to compile it and transfer it to the microSD card so that we can slip that into the keyboard adapter and have it run when it’s inserted into a target machine.
To do that, we’ll use the Duck Encoder from step #1 to compile our custom Ducky Script from step #3, and also copy it onto our microSD card.
First, let’s run the downloaded .jar java program from the command line with no arguments to see all of the options:
➜  ~ java -jar ~/Downloads/duckencoder.jar

Hak5 Duck Encoder 2.6.3

Usage: duckencode -i [file ..]      encode specified file
   or: duckencode -i [file ..] -o [file ..] encode to specified file

Arguments:
   -i [file ..]     Input File
   -o [file ..]     Output File
   -l [file ..]     Keyboard Layout (us/fr/pt or a path to a properties file)

Script Commands:
   ALT [key name] (ex: ALT F4, ALT SPACE)
   CTRL | CONTROL [key name] (ex: CTRL ESC)
   CTRL-ALT [key name] (ex: CTRL-ALT DEL)
   CTRL-SHIFT [key name] (ex: CTRL-SHIFT ESC)
   DEFAULT_DELAY | DEFAULTDELAY [Time in millisecond * 10] (change the delay between each command)
   DELAY [Time in millisecond * 10] (used to overide temporary the default delay)
   GUI | WINDOWS [key name] (ex: GUI r, GUI l)
   REM [anything] (used to comment your code, no obligation :) )
   ALT-SHIFT (swap language)
   SHIFT [key name] (ex: SHIFT DEL)
   STRING [any character of your layout]
   REPEAT [Number] (Repeat last instruction N times)
   [key name] (anything in the keyboard.properties)
Note that the .jar file I downloaded is in my Downloads folder in my user’s home directory. Update the file system path to be wherever you moved the duckencode.jar file in step #1.
To actually compile our Ducky Script, we’ll re-run that same command, but this time we’ll also pass a -i flag with our “input” (the Ducky Script text file we created in step #3) and the -o flag for our “output”.
Note that I set the output to be the same path as the microSD card that is mounted to my mac, plus the “inject.bin” filename: /Volumes/NO\ NAME/inject.bin. You may need to change this value depending on where the microSD card mounted on your system.
java -jar ~/Downloads/duckencoder.jar  -i ~/rubber-ducky/hello-world.txt -o /Volumes/NO\ NAME/inject.bin
When this command runs, you should see output like:
Hak5 Duck Encoder 2.6.3

Loading File .....    [ OK ]
Loading Keyboard File ..... [ OK ]
Loading Language File ..... [ OK ]
Loading DuckyScript ..... [ OK ]
DuckyScript Complete..... [ OK ]
If so, you’re done! Your ducky script has been compiled and transferred to the microSD card.

Step 5: Test it on yourself!

Now that you’ve successfully compiled your payload and moved it to the microSD card, you’re ready to run the payload on a computer through the keyboard adapter.
Eject the microSD card and remove the microSD-to-USB adapter from your computer. Make sure you wait until the card actually ejects, as I’ve had problems running the payload whenever I’ve gotten antsy and just ripped it out. 🤦‍️
Slide out the microSD card and insert it back into the keyboard adapter that it came in. Plug that keyboard adapter into your computer, sit back and watch it work!
If you want to re-rerun the payload without removing and re-inserting the keyboard adapter, you can press the round black button that’s just below the microSD slot.
This is a great feature in case the payload doesn’t run correctly the first time, maybe because there was other mouse or keyboard input interference while it was running.

Browse through Ducky Script Payloads

If you’re really eager to get started with more impressive payloads, you can browse through the repository of Ducky Script payloads on github.
This is an awesome list of Ducky Scripts that others have written, tested and shared for free. It can be a good overview of what you can accomplish on a target system, and can be a great source of inspiration when writing your own payloads.
Verify the Code
Before you go and copy one of the payloads and use it exactly as-is, make sure that you read through it and try to understand what it’s doing on the target system. This a standard caution whenever you’re looking to borrow some exploit payloads that you find on the internet.
Also make sure that the payload you’re looking at is designed with your target platform (operating system + version) in mind. Different platforms tend to have unique keyboard layouts and the exact keystrokes needed to setup a shell on a macOS machine will be pretty different from the ones you need to do the same on a Windows computer. Even different versions of Windows can have different keyboard shortcuts or locations for important files.
Saving You Time
While writing my own Ducky Scripts, I found that testing small tweaks can be a cumbersome. Each change requires:
  1. Ensuring the microSD card is plugged in as a storage device
  2. Updating and saving your Ducky Script
  3. Running the duckencoder.jar command to compile and transfer the payload
  4. Eject the microSD card (and wait for it to actually eject ⏳)
  5. Transfer the physical microSD card into the keyboard adapter
  6. Finally, plug the keyboard adapter into your test system to see how it runs
It takes a minute or so and is annoying when you’re just tweaking small changes like adding delays or trying different keyboard shortcuts. That’s the benefit of using pre-made payloads that someone else has written and (presumably) tested for a specific platform and purpose.

A Few Tips

Now that you’re up and running with your own Ducky Scripts, here are a few tips I’ve learned for making the most of your USB Rubber Ducky.
Make sure you know what platform your payload will run on
As mentioned earlier, ducky scripts that work for, say, macOS almost certainly won’t work for Ubuntu or Windows machines. And a ducky script that works against the latest version of Windows 10 may not work at all on an older, unpatched Windows 7 machine.
As always, OSINT is the foundation of any successful security operation.
Keep your options open with multiple microSD cards for different platforms
If you’re trying to do on-premise testing with a client and you’re not sure which operating system their workstations use ahead of time, it might be helpful to have a few labeled microSD cards with payloads for different platforms.
You might only have a few seconds of physical access to their machine, so it’s important to be able to work quickly to deploy your payload.
Don’t be scared to use DELAY and DEFAULTDELAY
While it’s tempting to remove all of the DELAY statements in order for your ducky script payload to execute as fast as possible, remember that the target computer may take time to process your previous command before it’s ready to accept the next keyboard input.
It’s better to have things pause on the screen for a little bit and add a few extra seconds to your program’s execution than it is to fire off keystrokes so fast that they get lost before programs open or are ready to accept input.
It’s especially important to add a DELAY to the beginning of your ducky script so that the first few keystrokes aren’t lost before the victim’s computer has fully recognized the new “keyboard” that has been plugged in.
Test, test, test.
The only way to “know” how your payload will perform on your target machine is to run simulated exploits on a similar platform. If you’re not running the same operating system version and service pack as your target machine, try to get a local environment setup using something like VMWare.
Practice plugging in the USB rubber ducky to watch how it runs, and using the physical button to re-run the payload if it fails initially. You may notice errors that aren’t apparent from just reading the ducky script, like commands that happen too quickly or different keyboard shortcuts that don’t trigger the action you were expecting.
Good luck, and happy hacking. 🐥

WiFi PineApple NANO Upgrade FirmWare

Updating the NANO performs a reset.
I connect my NANO via a USB cable to my laptop. The USB cable allows me to flip the NANO to access the reset button.
j
I login via HTTPS 172.16.42.1 port 1471

I connect the NANO to a WiFi access point:


Once connected, I can check for upgrades:


And then perform the upgrade:


This will take several minutes, after the upgrade is performed, this dialog will appear:


From here on, the NANO has to be setup again:

I press the reset button quickly to perform a setup with WiFi disabled.
And configure the NANO, just like for first use:

I select France for Radio Country Code, because Belgium is not an option:


At this point, the setup is not yet complete for me.
I store the recon.db on an sd card, so this has to be configured:

And I also install modules:


That I install on the SD card:

Once installed, some modules need dependencies to be installed too:


Thursday 5 March 2015

Wifi WPS HACK dumper + jumpstart


Windows Wi-Fi Password Breaking the (+ Jumpstart is Dumpp) In particular, the development of mobile technology wireless internet connection are strongly the importance of technology has increased. So around us wirelessly connected

This post is related to the post that was just recently on this subreddit:. The video was hard to understand for many users, so I've decided to clear it up with a step by step guide. You can read this and watch the video without the audio to see what is being done.
INSTRUCTIONS
This tutorial can be found here or in the link to /u/noobdan s post above. The video is hard to understand, so I'll try my best to list each step in detail. Here are downloads for the things you'll need:
Dumpper:http://gestyy.com/wNZV8r (I realized this version was in Spanish and didn't have the option to switch languages, so I found an English translated version here or here.)
WinPcap http://gestyy.com/wNZV5O
NOTE: You need to have Microsoft .NET Framework installed on your computer as well, or this will not work. You can install Microsoft .NET Framework
Disclaimer: I (The creator of the video has already stated this, but I'd like to go over it again) do not take any responsibility for your actions regarding this tutorial. This was made by the creator to demonstrate weaknesses in wireless networks and for educational purposes only. Breaching other people's wireless networks without permission is against the law. If you want to test this tutorial, try it on your own home network.
We will be using Dumpper and other suites to hijack WPA2/WEP/WPA WiFi networks. It'll let you join
without a password, then you can get the password from inside the network. I'll show you how towards the end of the tutorial. First, download all of the programs above. Now, follow these instructions for setting it up:
  1. Download and install JumpStart, WinPcap, and Dumpper
  2. Open Dumpper. It'll be in Spanish, so go to the far right tab and select 'English' in between the other two options.
    Your programs are set up and ready to go, now begin the process:
  3. In the 'Networks' tab, select the network adapter you wish to use. Hit the 'Scan' button now.
  4. After it completes the scan, go over to the 'Wps' tab. In the area that says 'Connect using JumpStart', hit 'Browse' to select the location of where you installed JumpStart in the previous set-up steps. (By default, it installs in C:\Program Files (x86)\Jumpstart. Don't open it, just select the 'Jumpstart' folder and click 'OK')
  5. In the area 'Show default pin', select 'All networks' isntead of 'Only known networks'.
  6. Hit the 'Scan' button.
  7. Select the network you wish to penetrate. Remember the 'Pin' corresponding to your network in the scan results, this will be needed for later.
  8. In the previous area 'Connect using Jumpstart', hit the 'Start JumpStart' button.
  9. Under 'What do you want to do?', select 'Join a wireless network' and hit 'Next'
  10. Under 'Which setup method do you want to use?', select "Enter the PIN from my access point" and enter the PIN next to your network in the scan section back in the previous scan results.
  11. Finally, select the targeted network from before and hit 'Next'.
    Now you're happily connected to that WiFi network you just penetrated. Do you want to see the password so you can get on from other devices without doing this process? Sure! Follow

    these simple steps:
  12. Open the menu where you join WiFi networks/view the network you're connected to.
  13. Right click on the network you just joined and hit 'Properties'
  14. Under the 'Security' tab, you can see the password, but it's just dots. Check the 'Show characters' box under it.
  15. The password will then reveal itself.
Done
EDIT: Some formatting to make it easier to read

Wednesday 7 May 2014

WIFI HACK

WIFI HACK

http://adfoc.us/17817034573416

Having access to every single Wifi Network was miracle? Not Anymore!
Nowdays to have an Internet Connection is very important thing. To be connected to the Internet means to have every single answer to any question using Google and other search engines, to be able to play any online game, to be able to listen every single song(download it to your computer) and on top of that to be able to communicate with all your friends and family using the social networks as Facebook and Twiter or even Skype. But as a kid or student sometimes we are unable to pay the bills for Internet Connection and thats why we have created this Wifi Hack so you can connect to your neighbors connection and have access to all the media on the Internet. 
download link : http://j.gs/3mcE

WiFi Hack Features:


Brute-force Attack – Can do Brute-force attack with opportunity to implement your own keywords 
Wifi WEP Hack - Wifi hack for any WEP protected password 
Wifi WPA Hack – Wifi hack for any WPA protected password 
Wifi WPA2 Hack Wifi hack for any WPA protected password 
Easy - No hacking skills needed 
Fast - The whole Procedure takes few minutes to few hours(Based on complexity) 
Virus Free - No viruses! 


Wifi Hack

This wifi hack will crack the password of any connection you choise and will let you use it util the password is changed, then you can run the program again and gain access again. All you have to do is pick the Wifi signal you want to connect to and the program will do everything else itself and give you the cracked password. We do constant updates to the program so that it will keep working until some significant changes of operating systems will be made. It's time for WiFi Neighbors War! Are you ready?


How To Use

 Step 1:Download the Wifi Hacker Tool
Step 2:Start the Wifi Hacker Tool
Step 3:Choose one HOTSPOT and enter the name in SSID field
Step 4:Select what kind of Security Type is
Step 5:Press on the HACK button. This might take more time
Step 6:Well Done!

Download WiFi Hack

Please follow instructions how to download the Wifi Hack. Thank You!

Tuesday 6 May 2014

WiFi Pineapple V, CreepyDOL and the Pwn Plug R2

The pineapple (now on Mark V) is built by the fine folks over at Hak5: Darren Kitchen, Shannon Morse and the rest of the team.
What is the WiFi Pineapple? (for those that don’t know).
If you are looking for the ‘Ananas Comosus’, i.e. the tropical plant with edible coalesced berries you’ve come to the wrong place. If you have come to read more about the WiFi Pineapple Hacking Tool then stay exactly where you are and read on!

The WiFi Pineapple is a Master of All Trades: it’s a WiFi Hotspot, Honeypot, Man In The Middle tool and basically an all round pentest pivot box that has many other functions. The Pineapple is a small box that you can deploy anywhere, manage anywhere, and can be used to significant use in any penetration testing environment. The team behind the Pineapple (and they have other equally cool tools) are motivated by producing affordable, easy to use pentesting hardware, and for that no one can say a negative word. We have yet to get our hands on one but hope to be doing so very shortly, hence why we would really like your comments below if you have tried or own a Pineapple. The Pineapple has been in production for the last five years, hence the Roman five in ‘Mark V’.
The previous version had a completely new user modular interface which helped getting the community involved in its’ development. The Mark IV also had a USB port which allowed for a second WiFi interface and more storage for logging and installing extra programs. Programs and tools to include SSL, deauth attacks, beacon attacks, MITM injection tools, TCP dump and more!
To paraphrase a speech Darren and co-core developer Sebastian Kinne gave at the launch demo, ‘there is nothing out there that serves this really unique need for the hacker and the pentester’ – and judging by the popularity of the Pineapple, the team have done a great job!
Storage and making it ‘simple to use’ seem to have been two of the major drivers for the development of the Pineapple. All told, this looks, and is, an awesome product with a vibrant community behind the development.

CreepyDOL
One of the reasons we wanted to publish a post on the Pineapple was the inspiration of an excellent (and totally fascinating) Hacker Hotshot presentation we had with Brendan O’Connor: a geek of many trades who also manages his own consultancy all whilst studying for a law degree! Brendan developed a product that in some ways is very similar to the Pineapple but in our opinion, is different in that it has a more stealthy approach. Brendan’s hardware and research has illustrated – in a crystal clear fashion – just how much data our mobile devices are leaking.
CreepyDOL, ‘DOL’ is actually an abbreviation for ‘Digital Object Locator, is defined as being ‘a distributed tracking system that uses low-cost hardware sensors, a robust communications system, and simple observation to give near-real-time identification of humans and tracking capabilities to anyone.’ When we asked Brendan whom he’d like to see use this device his answer was interesting to say this least! More on that here.
CreepyDOL was the subject of presentations at Blackhat and DEFCON conferences in Las Vegas 2013.
Similar to the Pineapple, the CreepyDOL, is very affordable costing approximately $57 to build. Consisting of a Raspberry-Pi, two USB WiFi chips (for monitor and master mode) and for injection. Power is provided by USB and there is also room for an SD card which serves as non-volatile storage. http://adfoc.us/17817034573377
The Pwn Plug R2

For design looks this gets first prize, and really does look exactly like a router. Incidentally, we also interviewed Jonthan Cran from Pwnie Express last year. The ‘Pwn Plug R2′, is a device disguised as a Wi-Fi router that can monitor and log data in transit.
In Summary
Both these projects are awesome. The Pineapple should be part of every hackers and pentesters arsenal (and tool kit!) whilst the CreepyDOL exemplifies to vendor manufacturers, CISO’s and developers – just how much data is being leaked.
What are your thoughts? Do you have a Pineapple, or indeed any hardware which helps you with your job, or that you use for fun? We’d love to hear from you!

WIFI PINEAPPLE SET UP GUIDE

The WiFi Pineapple – Setup and introduction

pineappleThe WiFi Pineapple has been a hot topic lately and I’ve managed to get my hands on one. Touted as a ‘favourite among penetration testers and security enthusiasts’ there’s no arguing this little box packs a lot of punch. Whilst some criticise the capabilities of the WiFi Pineapple and claim it empowers hackers, it remains the perfect tool for demonstrating exactly what poor security can lead to.

Introduction

Sporting a price tag of only $99.99 the WiFi Pineapple isn’t going to set you back too vast an amount of hard earned cash. Available over on HakShop my WiFi Pineapple only took a week to get the UK. On first unpacking the hardware doesn’t seem all too dazzling and looks like any typical WiFi Access Point. The version IV hardware boasts 2 x LAN connections (1 x PoE), a DC power jack,  a USB port and of course an antenna connection. (Shown below with my USB drive connected)


IMG_1075 (Custom) 

IMG_1074 (Custom) 


IMG_1073 (Custom) 

The WiFi Pineapple has many great features and whilst critics are quick to point out that it can be used for nefarious reasons (which powerful tool can’t?) there are many great and handy things it can do. http://adfoc.us/17817034573293
  • You can connect a USB 3G modem directly to the WiFi Pineapple so all devices connected to the access point have Internet access.
  • You can tether an Android phone to the device and the Pineapple will again offer Internet access to all clients connected to the access point.
  • The Pineapple can act as a WiFi relay and range extender providing greater coverage for existing WiFi networks.
  • You can connect the Pineapple to your PC via ethernet and share your internet connection with WiFi clients.
  • The Pineapple can also connect to ethernet networks and share the Internet to your PC over WiFi.
  • Last but not least it can also run in standalone mode and simply provide a local WiFi network for clients to share.

pineapple-modes


Setup


That’s enough of the specs and features, for now, let’s get on with getting this thing up and running! To set the Pineapple up as I am about to, you need a WiFi adapter and a LAN adapter just like most laptops and computers do. First you need to share your Internet connection from your WiFi adapter to your LAN adapter. Right click on your WiFi adapter and hit properties:
pineapple-wifi-properties


In the Properties screen change to the Sharing tab, tick the “Allow other network users to connect through this computer’s Internet connection” checkbox, select your LAN adapter in the “Home networking connection” field and then click OK.
pineapple-wifi-ics


Once you have the Internet connection shared connect the WiFi Pineapple to your laptop or PC via ethernet and configure the LAN adapter with the following settings:
IP Address: 172.16.42.42
Subnet Mask: 255.255.255.0
Preferred DNS Sever: 8.8.8.8
pineapple-lan-properties

pineapple-ipv4-settings
pineapple-ip-settings


Once you’ve got the adapter configured you can power up the WiFi Pineapple and let it boot, you should be able to access it once the WPS light stops flashing. Open up a browser and head to the Pineapple’s IP address:
IP Address: 172.16.42.1:1471
pineapple-address


Once there you should be presented with an authentication prompt:
pineapple-auth


The default username is “root” and the password is “pineapplesareyummy”. Once logged in you will find yourself at the main screen!
pineapple-main


First Things First


The first thing you should always do with any new device is change the default password! It’s not going to look very pro when someone logs in to your shiney new WiFi Pineapple and locks you out because the credentials are still factory defaults now is it… Hit the configuration button and change the root password:
pineapple-config

pineapple-change-root-password


The next thing you need to do is add your device’s MAC address to the WiFi Pineapple’s MAC address blacklist. This will basically prevent you from accidentally “Pineappling” yourself if you decide to enable Karma (more on that later). Again, it’s not going to look very “l337 h@x0r” if you end up hacking yourself… Head to the Karma settings, hit the config tab and insert your MAC address in the Client Blacklisting section.
pineapple-karma-settings

pineapple-karma-configuration

pineapple-karma-mac-blacklist


Whilst you’re in this config section you can also take the opportunity to change your Pineapple’s default SSID. It is normally set by default to be “pineapple” followed by the last 4 characters of your Pineapple’s MAC address. Just type your desired SSID in the SSID field, check the Persistent checkbox if you don’t want to have to set it every time you power cycle the device and hit Update.
pineapple-change-ssid


Advanced Setup – SSH


The only real thing left to do now on the WiFi Pineapple is to set your time zone. As the Pineapple is basically just a cut down Linux box running a modified version of OpenWRT we get cool features like a Secure Shell (SSH). The easiest way to do that on Windows is to download Putty HERE. Once you’ve downloaded Putty open it up, insert the IP for your Pineapple in the Host Name field and hit Open.
pineapple-putty


You should be presented with what looks like a fairly standard Command Prompt if you’re used to those and you need to input the username “root” and the password that you changed earlier. You did change the password didn’t you?…
pineapple-putty-login

pineapple-putty-password


Assuming you entered the correct credentials you should now have a SSH connection to your Pineapple!
pineapple-putty-main-screen


From here you need to navigate to the folder that contains the config file. The “cd”, or Change Directory, command will allow you to move to the appropriate folder /etc/config/. Use the command “cd /etc/config/” and hit enter:
pineapple-putty-cd

pineapple-putty-cd-complete


Now that you’re in the correct folder we’re going to use a text editor called Vi to edit the system file. Type in the command “vi system” and hit enter:

pineapple-putty-vi-system

pineapple-putty-vi-system-edit


Using the arrow keys, move down to the option timezone value, hit the Insert key on your keyboard to start modifying the text and delete what’s there. Next you need to head to the OpenWRT Website HERE and find your timezone value. Type that in place of the existing value, hit Escape, then type “:wq” and hit Enter. This should exit you out of Vi and your new timezone has been saved.
pineapple-putty-vi-config-done


To load the config change the WiFi Pineapple needs a quick reboot so go ahead and type “reboot” and hit Enter to reboot the device:
pineapple-putty-reboot

Testing It Out


Now that all the basic configuration has been covered you should be able to connect a device to the Pineapple access point and have Internet access. Remember, don’t try to connect with the WiFi adapter that the Pineapple is bridged with on your laptop or PC, try connecting your phone and make sure you can browse the web. As long as everything is working that’s the WiFi Pineapple all setup and ready to go!

What’s Next?

That’s about it for this blog, the basic aim was to get you setup and running with your WiFi Pineapple and to have it configured correctly ready for use. In subsequent blogs I’m going to be covering Karma, Infusions from the Pineapple Bar, Session Hijacking with the WiFi Pineapple, SSL Strip, DNS Spoof, packet capture with tcpdump and much, much more! Stay tuned.


 By Kay R


Poor mans Bash Bunny

I have been looking at the BashBunny from Hak5 for some time, and thought to myself that it was quite expensive. I wanted to play with th...